

Mighty Micro-greens!
Mighty Micro-greens!
Want to pick fresh greens from your garden, even in the middle of an Idaho winter? One way, of course, is to build your own backyard greenhouse, but greenhouses can be not only expensive to build, but expensive to heat in the winter… very expensive. Here’s another approach you might want to try- microgreens.

Perhaps micro-greens are new to you, but eating these tiny plants as a flavorful and nutritional garnish has been around for years. Many restaurants are now adding micro-greens to their farm fresh menu items. And studies suggest that these tiny plants can have up to 5 times the nutritional value of mature vegetables.
So, you might ask, are these just sprouts? Well, no, not really. Micro-greens are not sprouts, they are seedlings; which includes the stem, seed-leaves and first true leaves, but not the root. Unlike sprouts, microgreens are vegetables or herbs that are grown in a shallow container of seed-starting mix in a sunny windowsill or under grow lights. Microgreens are harvested when plants are still small and immature with a pair of cotyledons (the leaves that pop out of the seed when it sprouts) and sometimes the first set of true leaves just opening. In this tender young stage, nutrients are concentrated, textures are delicate, and you can enjoy the essence of each flavor as an accent to your favorite dish.
 Almost any vegetable, herb or flower with edible leaves can be planted in a shallow container of potting mix right on your windowsill and harvested within a few days or weeks. Because you’re not trying to produce a mature plant, these tiny seedlings can be grown in the low light of winter without additional heat or fertilizer.
 Growing microgreens is easy. Use a shallow container with drainage holes. You can even use something you already have around the house such as a recycled plastic clamshell container, like those used for berries or cherry tomatoes in the grocery store. Make sure to first wash the container in warm soapy water to remove debris and then sanitize in a 1:9 ratio of bleach to water for 30 minutes. When the containers have finished soaking, rinse them in clean water prior to use. Fill your container with at least an inch of media- preferably a good quality seed starting mix. Flatten the soil by gently pressing with a piece of cardboard cut to fit container. Scatter seeds then cover with less than 1/4 inch of seed starting mix. Water lightly then replace the top of the clamshell. Watch closely and remove the clamshell top as soon as seeds sprout. Make sure the soil stays moist, but not soggy. Watering by soaking the tray from below will prevent soil from splashing onto the plants. Frequently misting with a spray bottle will also help to achieve the right germinating conditions, but requires more attention. Most varieties are ready in 7–14 days when seedlings are 1–2 inches tall.
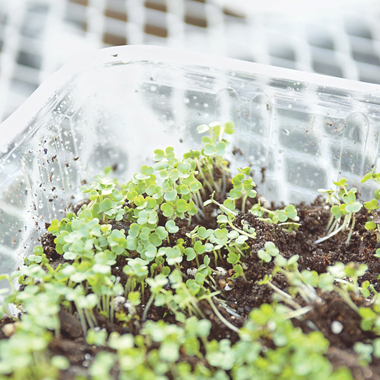
Growing microgreens isn’t just practical; it’s also fun! This winter, they will not only enhance the flavor of all your meals, but they will also give you that gardening “fix” when there’s two feet of snow outside. And just think how fun it will be for kids or guests to snip their own microgreen freshness from the tray right onto their plates. Everyone will be saying, “Pass the microgreens, please!”
Sources- https://www.botanicalinterests.com/articles/view/30/Microgreens-For-Winter-Meals, http://hartseed.com/grow-baby-grow-microgreens/